Ottolenghi. A man with taste.

It's lovely that so many people love the LittlePod range, expecially those who really understand good food. Yotam Ottolenghi is one of the fans, and that makes me really happy! I'm a big fan. And not only is he a fan, but he's selling our vanilla paste on his new website!


http://webstore.ottolenghi.co.uk/collections/pantry/products/vanilla-paste

Nuts about cookies

I've been losing weight gradually over the last few months (over 2stone in 7months!) and my palette has developed. I'm less attracted to sugary foods and get a kick out of spices and veggies. I've become a proper rabbit!

But I still need a fix from time to time. Here's my favourite recipe to quench my salt/sweet tooth cravings. 


Peanut Butter Cookies
(inspired by http://www.101cookbooks.com/archives/peanut-butter-cookies-recipe.html image from there)


125g spelt flour (or other wholewheat flour)
1 tsp baking power
225g peanut butter (go for a NAS one, I used smooth but you can use crunchy)
40g cacao nibs (sold in wholefood shops, if you can't find them, use roughly grated very dark chocolate)
170g agave syrup (again, available in wholefood shops and some super markets, replace with maple syrup if you can't find it)
1 tsp littlepod vanilla essence

Preheat oven to 350F degrees. Place racks in the top third.
In a medium mixing bowl combine the flour, baking soda, and salt. in a separate larger bowl combine the peanut butter, maple syrup, olive oil, and vanilla. Stir until combined. Pour the flour mixture over the peanut butter mixture and stir until barely combined - still a bit dusty looking. Let sit for five minutes, give one more quick stir, just a stroke or two. Now drop by heaping tablespoonfuls onto parchment-lined baking sheets. Press down on each one gently with the back of a fork. It's a loose batter, so if you're set on doing criss-crosses, go ahead and chill the batter for an hour or so before this step. Bake for 10, maybe 11 minutes - but don't over bake or they will be dry. Let cool five minutes and transfer to a cooling rack.


Give it some lolly

Frankly, I think ice cream is appropriate whatever the weather. Admit it: ice cream always makes you happy! While watching my waistline, I haven't really had the opportunity to eat any ice cream, seeing as it's frozen cream with some added sugar, not exactly diet friendly.

But... what if you could get all the yummy sweetness and creamy consistency without all the added calories? Sound good? Oh, did I mention it was really easy, cheap and one of your five a day? You're welcome!


Chocolate banana lollies
(makes 4)

4 x ripe bananas
1 tsp LittlePod chocolate extract
2tsp dark chocolate cocoa (like Bournville - make sure it has no added sugar!)
1tsp agave syrup

Now just blend it all together! I used a handheld blender, but you could put it in a food processor, or even use a potato masher. Then pour mixture into lolly moulds (these are easy to find and very cheap, I got mine from Sainsbury's for a whole £1!) and freeze overnight. Pour hot water over moulds to loosen the lolly when you're ready to tuck in, and enjoy.


Adding some Zest...

Sometimes you find a recipe and you just need to share it. This is one of them! Thanks to Zest Magazine for this brilliant carrot cake. It's both sugar and gluten free, so very kind on your insides, and goes down a treat. See my attempt below...


For more health and fitness inspiration, visit zest.co.uk

The good, the bad, the hungry...

Hi all! Well, I have got a list of magical, amazing recipes that I need to put up here, but a super special LittlePod project using my main profession (as a designer) has been taking up a lot of time recently. Expect more posts at the weekend! Until then, have a ganders at this mouthwatering and guilt free recipe by my good friend Danii. Brilliant website with lovely recipes for an anti-cancer diet way of life!


www.goodbadhungry.co.uk

Special Brownies


Now, these may look like naughty treats, but look at the ingredients! No sugar, no flour, vegetables... well, black beans! These replace the flour, making these deliciously moist and wheat-free!

The recipe is inspired by this one: http://www.101cookbooks.com/archives/amazing-black-bean-brownies-recipe.html but I've added LittlePod coffee extract and converted it all to grams etc.

Here you go!

Black Bean Brownies

Makes 30-ish

120g dark chocolate
150g butter
400g black beans (tinned, rinsed)
200g walnuts
1tsp LittlePod vanilla paste
40ml coffee extract
4 eggs
400g agave 


Preheat the oven to 325°F. Line an 11- by 18-inch (rimmed) baking pan with parchment paper and lightly oil with walnut oil.

Melt the chocolate and butter in a glass bowl in the microwave for 1 1/2 to 2 minutes on high. Stir with a spoon to melt the chocolate completely. Place the beans, 1/2 the walnuts, the vanilla extract, and a couple of spoonfuls of the melted chocolate mixture into the bowl of a food processor. Blend about 2 minutes, or until smooth. The batter should be thick and the beans smooth. Set aside.

In a large bowl, mix together the remaining walnuts, remaining melted chocolate mixture, LittlePod coffee extract, and salt. Mix well and set aside.

In a separate bowl, with an electric mixer beat the eggs until light and creamy, about 1 minute. Add the agave nectar and beat well. Set aside.

Add the bean/chocolate mixture to the coffee/chocolate mixture. Stir until blended well.

Add the egg mixture, reserving about 1/2 cup. Mix well. Pour the batter into the prepared pan. Using an electric mixer, beat the remaining 1/2 cup egg mixture until light and fluffy. Drizzle over the brownie batter. Use a wooden toothpick to pull the egg mixture through the batter, creating a marbled effect. Bake for 30 to 40 minutes, until the brownies are set. Let cool in the pan completely before cutting into squares. (They will be soft until refrigerated.)

Best served with hot coffee. Enjoy! x

Cream of Mushroom Soup (with no need for cream!)

As well as being on a health kick at the moment, I'm trying to be more sensible with my finances. Yawn! But a change from a shop bought sandwich is refreshingly welcome! And everyone knows homemade soup is the best kind of soup. EVER. Here's one inspired by LittlePod's own Dave Buchanen. Last year he made a fantastic sweetcorn chowder for us LittlePodites, and once I'd taken out all the butter and cream, I found it hadn't lost any of it's fantastic flavours. Perfect for lunchboxes, and suprisingly filling, enjoy! x

Mushroom and Sweetcorn Soup

serves 4

1 pack organic mushrooms (your favourite/cheapest variety), roughly chopped
1 can naturally sweet sweetcorn
1 white onion, chopped
1 tsp olive oil
1 garlic clove, crushed
1 litre boiled water
1 chicken stock cube
1/2 vegetable stock cube
1 tsp LittlePod vanilla extract
generous grinding of pepper & salt
1 tsp dried thyme
1/2 tsp nutmeg

Instructions:

In a deep saucepan, lightly fry the onion and garlic in olive oil until beautifully translucent. Next, add the pepper, salt, thyme and nutmeg. I crushed them altogether with a mortar and pestle to unleash the flavours (and my pepper grinder is broken!), then added the mushrooms. It will smell delicious right about now! If it's sticking to the pan, add a dash of water. Once the mushrooms have softened but still have a little bounce to them, add the sweetcorn, water and all. Next, add the water, stock and LittlePod vanilla essence. Leave to bubble away for about 20min, then take off the heat. Blitz with a hand held food processor, and add more seasoning if desired. If you're feeling a little bit more carnivorous, grill some smoked bacon until truly crispy, chop up and add after pureeing. 

Perfect served with a hunk of freshly made bread, but very satisfying all by itself.

I didn't take a picture of it, so here's a little product placement - try Black + Blum's range of lunchboxes! The stylish way to take your lunch to work, no need to be embarrassed by ugly tupperware! Visit them at http://www.black-blum.com/homepage/


Sweet treats

New years are full of resolutions and unrealistic goals - no alcohol, running every day, cabbage soup, detoxes, urgh. But we all know that if we set such resolutions, chances are we'll fall off the wagon and normally with quite a bump. I've started 2012 with a real health boost (and it's paying off, 9lb lost so far!), but still treating my sweet tooth. Here's my ultimate fix - not too sweet, but packed full of flavours. The rock salt is a brilliant addition and I've tried to keep the ingredients as wholesome and organic as possible. No refined sugars here! Enjoy, peapods x

The Ultimate LittlePod Peanut Butter Cookies

(makes about 12)


Ingredients:


125g spelt flour (or a wholewheat flour if you can't get spelt)
1 tsp baking powder
225g peanut butter (my favourite is Whole Earth organic smooth, with no added sugar)
40g cacao nibs (this is fermented cocoa beans, the origin of chocolate! If you can't find them, use the highest content chocolate you can find)
75ml extra virgin olive oil
170g agave syrup (becoming more readily available, as are natural sweeteners like Sweet Freedom, made from fruit sugars and tastes like honey)
1 tsp coarse sea salt
2 tsp LittlePod vanilla extract

Instructions:

Preheat oven to 350F degrees.

Combine the flour, baking soda, and salt in one mixing bowl, then in a separate larger bowl, combine the peanut butter, agave, olive oil, and vanilla essence, stirring until completely combined. Pour the flour mixture over the peanut butter mixture and stir until nearly mixed, but still a bit dusty looking. Let sit for five minutes, give one more quick stir, just a stroke or two. Now drop by heaping tablespoonfuls onto parchment-lined baking trays. Press down on each one gently with the back of a fork. I sprinkled a bit more sea salt on a this point, it looks lovely and adds another kick to the cookies. Bake for 10 minutes, until a lovely golden colour. Let cool five minutes and transfer to a cooling rack.

Normally I prefer the taste of cookie dough, and always get a bit disappointed with the final result. Trust me, you won't have that problem with these! And full of healthy bits, no sugar and no butter!

Inspired by the brilliant http://www.101cookbooks.com/archives/peanut-butter-cookies-recipe.html

A quick fix

Hello! And massive apologies for the gap in posts - in fact I think gap is a bit of an understatement, seven months counts as more of a gaping chasm. But don't worry, I've got a whole bunch of recipes to share with you over the coming days! And here's a double whammy to start us off. 

First on the menu is a simple breakfast fix - both filling and healthy, which your sweet tooth will love.

Breakfast in a hurry

3 tbsp reduced plain yoghurt of your choice (I really like this Alpro Soya one, which has a slight vanilla flavour)
1 x banana (sliced)
1 tsp LittlePod vanilla paste
a splodge of agave syrup

Instructions:

Combine all the ingredients in a bowl, and dig in! Perfect if you don't have much time in the morning.


And for lunch...

Who doesn't like cheese on toast? It's the perfect fast snack, and would be lovely served with rocket salad, dressed in olive oil, balsamic vinegar and a dash of LittlePod vanilla essence.

2 x slices of good quality bread
Dash of olive oil
Crumbly goats cheese
1 tsp LittlePod vanilla paste

Instructions:

Lightly toast the bread, then rub the olive oil in and stick under a grill. When it's got nice and crispy, top with the goats cheese and LittlePod vanilla essence and grill for a bit longer, until the cheese is starting to turn gorgeously gooey. Enjoy!


Now I promise to add more recipes soon, until then, enjoy! And get ready for LittlePod coffee extract launching soon, ooooooh!


Optimistic Spring Salad!

The sun was out ALL DAY! That warrants a lovely swim and a energy boosting salad I think. I have recently bought Yotam Ottolenghi cookbook called Tender, which has been a real inspiration. I've always loved veg, but Ottolenghi takes them to the next level. And yes! He is a fan of LittlePod! I can't wait to visit his restaurant, I'll keep an eye out for vanilla-based meals - apparently he uses LittlePod in the kitchen.

My spring salad has all the sweetness and freshness that Spring has to offer, with a little chilli kick to help shrug off the last fingers of Winter. Enjoy as a light dinner or perfect packed lunch. I'm doing both!


Optimistic Spring Salad
serves 2

Ingredients:
1 x courgette
1 x carrot
1 x sweet red pepper
1 x smoked mackerel fillet
10 cherry tomatoes
4 freshly picked basil leaves
1 tbsp sesame seeds

1 tbsp organic olive oil
1/2 tbsp agave syrup
juice of 1/2 a lemon
1 x garlic clove, finely chopped
1/2 tsp dried chilli flakes
1 tsp LittlePod vanilla extract

Instructions:

Top, tail and peel the carrot, and don't put your peeler away! Peel the rest of the carrot into wide ribbons, and do the same to your washed courgette. Quarter the cheery tomatoes, and use scissors to chop the basil leaves into thin strips. Add these all to a large mixing bowl, and crumble in the mackerel fillet. Add the sesame seeds and mix with salad servers.

To make the dressing, combine all the remaining ingredients in a small jug, using a spoon to mix well. Pour this all over your salad, and toss, coating everything in the dressing.

Serve with a fresh white wine, it's that easy! Believe me, this is going to become a favourite.

Vanilla, Agave Syrup & Cocoa Nib cookies

New year, new recipes! Also, new ingredients. I've been researching the impact the foods we eat have on our bodies (due to a recent cancer diagnosis of a close family friend) and was recommended Anticancer: A New Way of Life by Dr David Servan-Schreiber. With this in mind, I raided Wholefoods and found a lovely sweet alternative to sugar. And here's the good news - it works perfectly with vanilla! Sorry for the lack of photo, they disappeared too fast, the guys at work couldn't tell that they didn't have the normal naughties in! I'm a complete agave convert.

Ingredients: 

1 cup agave syrup
1 cup butter (room temperature)
2 tsp LittlePod vanilla extract
1 egg
3 cups wholewheat flour
1 tsp baking powder
1/2 tsp salt
1/3 cup cocoa nibs

Instructions:

Preheat oven to 375F. Mix syrup, vanilla and egg in large bowl. Stir in flour, baking powder, salt and nibs to make a stiff dough. On a greased baking tray, dollop teaspoons of the mixture, leaving about 2inches between each cookie. Bake in the oven for 10 minutes, or until a golden brown. Cool on a wire rack and keep in a tin to keep them fresh. 

(recipe adapted from pastrywiz.com)

Curry in my tummy

I've been feeling the cold like everyone else in the British Isles for the last few weeks, and foolishly turned to chocolate and pub lunches. Noooooo! Hearty fare does not always mean heart failure. So I decided to make a curry stuffed with veg an comforting aromas. And don't worry, I'll cook with something other than butternut squash soon, they're just soooo good and healthy!


Butternut Squash, Cabbage and Chickpea curry
serves 4

Ingredients:

1 butternut squash
1 red onion
1 tbsp olive oil
1/2 savoy cabbage (or kale if you can find it - the flavour is amazing)
2 garlic cloves
1 can chickpeas
1 pint vegetable stock
1/2 tsp chilli flakes
1 tsp dried coriander
1 tsp fresh chopped coriander
1 inch ginger
1 tsp cumin powder
1 tsp LittlePod vanilla essence
2 tbsp no fat plain yoghurt

Instructions:

Start by peeling and chopping the butternut squash, and roast it in the oven with half the oil for 30min. Meanwhile, chop the onion and heat the rest of the oil in a deep sided frying pan. Add the chilli flakes, cumin, dried coriander and grated ginger for a minute before adding the onion, and once they're soft, add the garlic and LittlePod vanilla paste. Keep moving it around for a few minutes, and enjoying the smells, then add the chickpeas and chopped cabbage. Turn the heat down as ow as it will go, adding the roasted butternut squash and stock, and cover. Let this bubble for at least half and hour, to turn into something special. If it's looking too watery, take the lid off for 10/15min.

Get some rice on the go while you're waiting - I'm really into brown basmati at the moment and that seems to take ages to cook. Your curry will wait for the rice, don't worry, the mushier the better. At the last minute, add the yoghurt and mix in the fresh coriander. Serve with a nice lime pickle or mint raita (mango chutney is so full of sugar I avoid buying it now, the temptation is too much,) and enjoy something warm, filling and good for you.

Believe me, it will give you a big boost! My blip away from my 5 a day has made me realise the big difference in my energy levels, what we put in to our bodies really effects it's performance. Obvious, but easy to take for granted.

Soup to warm the heart

When it's chilly outside, it's best to fill up the internal radiator unit (tummy!) with wholesome, filling soup. Inspired by LittlePod's very own chef, Dave Buchanen, I concocted my very own chowder, based on his sweetcorn chowder with a few additions/substitutions. Dr Beesley prescribes this as a take to work lunch in a thermos, served with crusty fresh bread and butter. Don't feel bad about the butter, not when the soup is so low fat and good for you!


Butternut Squash, Sweetcorn and vanilla Chowder

Serves 4

Ingredients:

1 white onion
1 tbsp olive oil

1 butternut squash
1 can of sweetcorn
100g of mushrooms

2 garlic cloves
dried chilli flakes
1 pint chicken stock

1 tsp LittlePod vanilla paste
100g light philadelphia (I like the garlic & herb one!)
pepper & salt (to taste)

pumkin seeds to serve


Instructions:

Peel and cube the butternut squash and roast in a pre-heated oven at 350F/175C with half the olive oil and a sprinkling of s&p. It should take about 30min for them to soften, but check after 20min. A knife should go through them easily, like a boiled potato. Chop the onion and lightly fry in a large saucepan with the rest of the olive oil. After they've gone soft and translucent, add the mushrooms (if they're big ones, cut them up a bit) and the drained can of sweetcorn and peeled and roughly cut garlic. Add a small 1/2 tsp of chilli flakes, you can add more later if you're feeling brave!

Once the mushrooms have softened, add the butternut squash to the pan, the chicken stock and a tsp of LittlePod vanilla paste. Leave it on a light simmer for 30min, adding the philadelphia right at the end then blitz it! I love the handheld blitzers, just don't get to enthusiastic - keep the soup in the saucepan! Now put it back on the hob for a few minutes to heat it all up again (while you give your bread a chance to get a bit toasty in the oven) and season to taste.

Ladle into bowls, serving with warm crusty bread and a sprinkling of pumkin seeds to make it look extra special. Now tuck in and forget about the cold weather outside!

It's easy on a Sunday morning!


There's nothing like a lazy Sunday, and what better way to start it than with something hot and satisfying. I recommend French toast with a twist!

Serves 2


Ingredients:

1 tsp olive oil
4 pieces fresh thick white bread
2 large free range eggs
splash of milk

1 tsp LittlePod vanilla extract
1 lemon, freshly squeezed
sugar to serve

Instructions:


In a wide bowl, crack the eggs and add the milk and LittlePod vanilla extract (or any other LittlePod vanilla ingredients, the paste works wonderfully) and whisk it all together. Drizzle some olive oil in a frying pan and put over a mid to high heat. Dip the bread in the egg mix and lay them in the frying pan. Turn over so they're golden brown on both sides, then serve with lemon and sugar and a lovely glass of freshly squeezed orange juice and relax!

Vanilla Risotto with Butternut Squash & Button Mushrooms

On Saturday, my culinary eyes were opened! Dave Buchanen, the new LittlePod chef, created a magnificent 6 course taster menu using the LittlePod ingredients and a lot of pazzazz. LittlePod took over the restaurant of the Sid Valley Hotel and fed fans and friends of the company. I took the family along and we all had a lovely time (there was even wine tasting!). Inspired by the vegetarian main course of Roasted Baby Bell Peppers with Butternut Squash Risotto, Parmesan Crisp & Vanilla Glaze, I made my own (simplified and recreatable!) version. Enjoy! To sample some recipes from Dave's pro kitchen, visit his new blog - http://littlepodchef.blogspot.com/ and try out his Mixed Summer Berry & Sambucca Sabayon, another of the courses from the Sid Valley evening, which was amazing.
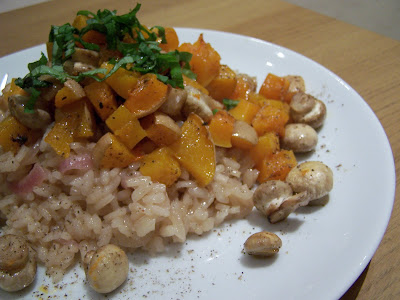


Serves 4

Ingredients:

400g aborrio risotto rice
2 tsp butter
1 glass white wine
1 tsp LittlePod vanilla paste
(you could use the extract, or the seeds of 1 pod, but I love using the paste! It's the best of both worlds)
1 pint of chicken stock
1 tbsp olive oil
1 red onion
3 cloves of garlic
1 butternut squash
1 pack button mushrooms
a few basil leaves
pepper & salt (to taste)

Instructions:

Chop (and peel if desired - I like the added texture of the skin) the butternut squash into cubes (I cut mine into approx 1cm squares so they'd be easy to eat and faster to cook), dice the onion and garlic and drizzle with olive oil in a large roasting dish. Place in a mid to high oven, keeping an eye on it. You want them to be soft all the way through and brown. If it's ready before the rice is cooked, just turn the temperature down and keep warm. Add the mushrooms about 5-10 min before the rice is ready. Don't worry if you get the timing wrong! Both elements will be fine keeping warm for a bit.

Once the veg is in the oven, put a large pan (a non-stick frying pan with big sides or a wok would do) over a mid range heat and add 1 tsp of the butter. Once it has melted, add the rice and fry for a minute. You don't want it to go brown, just a bit translucent. Then add the wine and the LittlePod vanilla paste and watch it bubble, stirring well. Once the liquid has all but evaporated, start adding the stock, a ladle at a time, stirring regularly as you don't want it to stick to the bottom of the pan. It should take about 20min for the rice to absorb all the stock and to lose it's bite, test it after 20min and give it some water if it's not soft all the way through. Once it is, turn the heat off, add the extra tsp of butter and let it rest of a minute with a lid on the pan. Trust me, this will make it extra yummy! Add pepper and salt to taste. Remember that stock can be quite salty anyway, so don't go over the top.

To serve, plate up the rice and top with the roasted veg. Chop some basil leaves up and put on top. Some freshly grated/pared parmesan is perfect with it!